Everything You Need to Know About Placing, Evaluating, and Trusting Pitons
This article originally appeared on Climbing
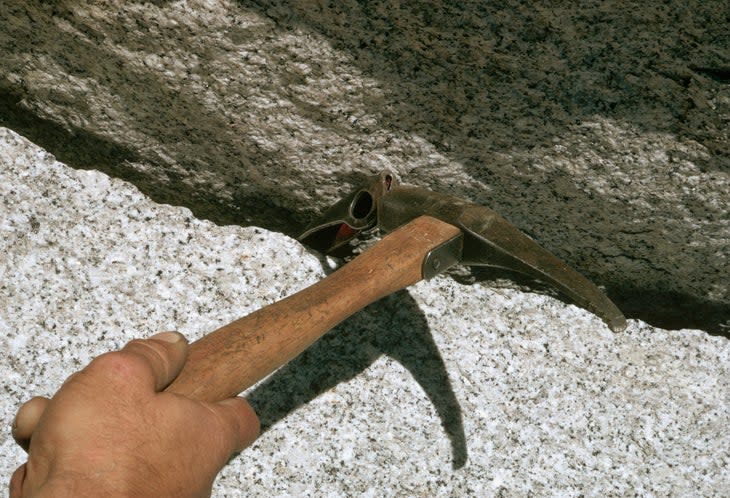
Pounded dramatically and deafeningly into a crack on a vertical wall with a hammer, the steel spike called a piton was the first major safety advancement beyond the basic climbing rope in two thousand years. It enabled solid anchoring for descents and protection or aid going up routes that had heretofore been life-threatening. Today, whether you are confronting the classic "Pin Ladder" crux (5.9) at the top of Yellow Spur in Eldorado Canyon, Colorado, or tying off an A3 knifeblade for aid on a new Grade VI on Nameless Tower in the Karakoram, it is still important that you have some knowledge of pitons. Those few of us left from the Golden Age of Pitons are not going to live forever, so I hope I can pass along a little history and a few lurid secrets from the dark past of pitons before 1971.
When I began climbing in 1962, climbers all over the world used pitons exclusively. For the next nine years I did too, placing and removing, in a great variety of rock types, many hundreds of them. More than any other climbing tool, I cherished three or four of my "go to" pegs, which I desperately slammed in, with numbed forearms, when I feared for my life.
The History of the Piton
Although some huge spikes, ropes, and ladders were used on the very first recorded rock-climbing expedition, the ascent of Mount Aiguille near Grenoble (in 1492!), the first real pitons (French: piton, "little peg"; German: felshaken, "hooks for rocks," or sometimes fiechtlhaken, "Fiechtl's hooks") for rock-climbing were invented in Europe in the late 1800s. Initially, they were five-inch long, blade-like pieces of iron, similar to a railroad spike but flatter, bent up into a hook. The climber would hit the piton into the rock with a hammer and perhaps tie a short piece of smaller rope around the spike. On descent, the climbers lowered on their main rope from the loop or spike, hand over hand, and then the main rope was pulled and tied back into, much as we do today rappelling. The piton itself was left in place. Soon, to eliminate the smaller loop of rope, a hole was drilled in the end of the piton and a smaller iron ring inserted into the hole; these were ring pitons.
Descending a mountain has always been technically more dangerous than climbing up. During the descent after the 1865 first ascent of the Matterhorn, a very short fall by one climber pulled three others off, causing the deaths of four of the seven climbers in Edward Whymper's party. Around 1900, the carabiner and body rappel had not yet been applied to climbing, so the piton was at first only ethically accepted for very short, steep descents, but not for upward progress. This hundred-year-old, arbitrary, ethical decision is the reason that we today try very hard to physically ascend a 40-foot route as freely as possible, yet don't give a moment's ethical thought to using aid (rappel or lowering or even a ski lift or helicopter) to go back down. Odd, right? Metaphorically, we only want to go up, get higher, ascend.
Perhaps the first modern piton appeared in 1910 when the Austrian climber Hans Fiechtl was the first to use specially made pitons forged with an eye, rather than a ring or hook. The eye was quite large at first, to accommodate a thick rope. About the same time, his partner, Otto Herzog of Munich, who was, interestingly, nicknamed Rambo for his tenacity (from German: ramponieren "to crush"), saw some metal rings on firemen and fashioned a steel carabiner for climbing to enable a leader to use a running belay as he climbed past and above his piton. This emphatically enhanced the safety of the lead climber and presumably created, at some point, the very first whippers. Parenthetically, carabiners (German: karabinerhaken, "hooks of carabineers," i.e., horse soldiers with carbines) were named after a quick-release metal connector used by Italian and German cavalry of the day to connect a strap to their short rifles.
Sliding down an anchored rope for a safer descent--with the rope looped around the hip, over the opposite shoulder, and down the back (German: abseilen, literally "down-roping")--may have been invented in 1879 by Chamonix guide Jean Charlet-Straton while descending after the FA of the Dru. But the body rappel has always been known as the Dulfersitz after the German Hans Dulfer, partner of Fiechtl and Herzog, who probably perfected and popularized the technique about 1911. These inventive Young Turks of the pre-war climbing world quickly realized that the rope-piton-carabiner combination, with the second climber braced and holding the rope, would allow significantly more daring routes to be climbed if one were allowed to use such tactics on the way up. And one might also use a "few" pitons for direct aid. A new world of rock climbing was thus born.
After World War I, pitons and carabiners slowly gained widespread use all over Continental Europe. Pitons made in Austria, France, Italy, and Germany were fabricated from somewhat harder steel alloys and sometimes plated on the outside to prevent quick oxidation. These new pitons were now tough enough to sometimes be knocked out after placement, and possibly be reused two or three times, an obvious logistic advantage on very long routes, as well as saving money for some dirtbag Euros of the 1920s and '30s.
A blade piton for a crack larger than, say, half an inch, would have been very heavy, so the lighter, V-shaped angle piton, usually with a ring, was introduced for wider cracks, up to an inch and a half. In France, climbers used wooden wedges (Coins de Bois) for aid in very wide cracks, up to 5 or 6 inches. The first important piton uses in the United States were by Albert Ellingwood on the technical volcanic plug of Lizard Head Peak in Colorado in 1920 and then by Chicagoans Joe and Paul Stettner in 1927, using iron, ring-angle pitons from their native Bavaria, on the first ascent of the East Face of Longs Peak (Stettner's Ledges [5.7]).
After World War II, the best pitons were made in Europe by Stubai, Cassin, Simond, and Charlet-Moser. Made of tougher steel and plated with nickel, zinc, cadmium etc., these pins could be re-used several times, and the plating made any fixed pitons safe for longer, before they became too rusted to be trusted. Americans imported and used these pitons until the early 1960s.
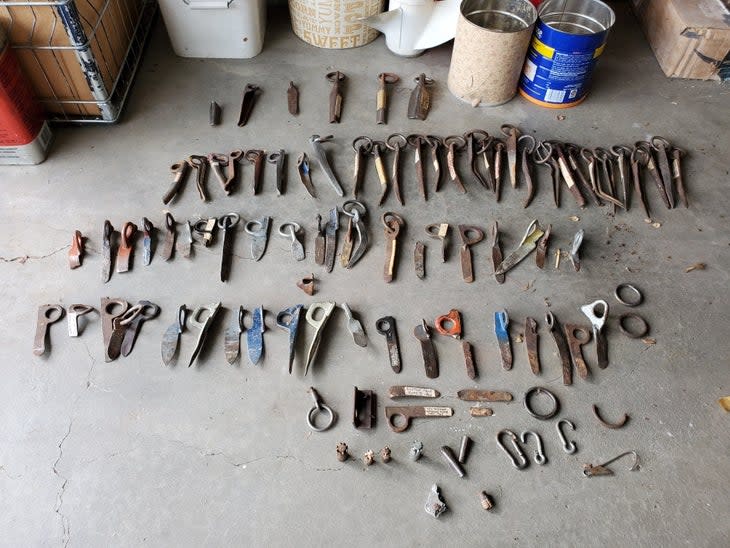
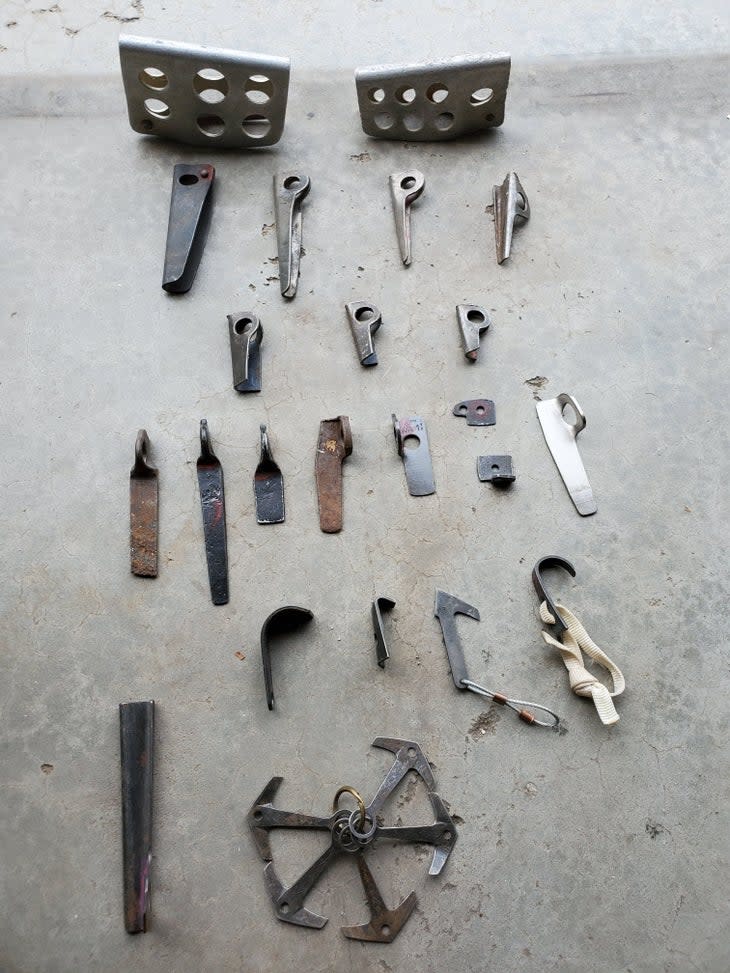
In 1946 in Yosemite Valley, John Salathe, a Swiss-born climber and blacksmith, noted how inadequately these European pitons worked in the solid Valley granite. He decided to make an even harder piton out of an old Ford Model-A axle: high-carbon chrome steel with vanadium and molybdenum. He made several pitons that could be re-used many times for his multi-day first ascents. In the late 1950s, Yvon Chouinard met and talked with Salathe in the Valley, and Chouinard decided to start making hardened steel-alloy pitons like Salathe's for his own use in Yosemite and elsewhere. He learned how to forge pitons out of 4130 steel (iron, carbon, manganese, silicon, chromium, and molybdenum) and soon made a whole range of pins still popular today. These include:
RURPs (Realized Ultimate Reality Piton): The smallest piton, about the size of a large postage stamp. The blade went into the rock only 1/4 ", and could be used in hairline cracks only 1/16" wide. This is the only piton that won't hold falls--just body weight.
Knifeblades: For cracks 1/8" thick; 1 to 2 inches of blade depth.
Lost Arrows: Many different sizes from 3/16" to 3/8" thick; 2- to 4-inch blade depth.
Angles: V-shaped pitons for cracks from 1/2 ' to 1 1/2 ".
Bong Bongs: V-shaped for cracks from 2"up to 6". Sometimes made of aluminum or with holes to make them lighter weight.
Chouinard started selling the pins to climbers he knew in Yosemite and the Tetons, but the pitons were so well-made and climbing had become so popular that it soon turned into a huge business: Great Pacific Iron Works, which spawned Chouinard Equipment, Black Diamond, and Patagonia, was born. Chouinard's pitons were so tough that they could be reused many dozens of times (saving money for dirtbag American climbers), and they enabled the El Cap climbers of the 1960s to put in new aid routes that demanded 400 to 500 piton placements while carrying only 40 to 45 pitons up the wall. The chrome-moly piton revolutionized big-wall climbing all over the world.
Unfortunately, it was slowly discovered that these magnificent inventions had a serious, unforeseen side-effect: When they were removed, the hardened steel was tougher than rock they'd been pounded into, incrementally causing irreversible piton scars. Between 1971 and 1974, American rock climbers abruptly stopped using pitons, and switched to artificial chockstones (nuts) to preserve the natural resource of the now-popular sport. This was the "clean climbing" revolution. Since many of today's free climbs were once climbed as aid routes, some still have pitons left in the rock that were too difficult to remove or too rusted. Some of these may possibly be trusted to hold short falls and some, while looking solid, may be worthless. Many of the pitons that one finds on a popular rock climb today has been there 20 to 50 years. Don't trust them without testing, and when possible, back them up.
Some Initial Considerations
When to use a piton
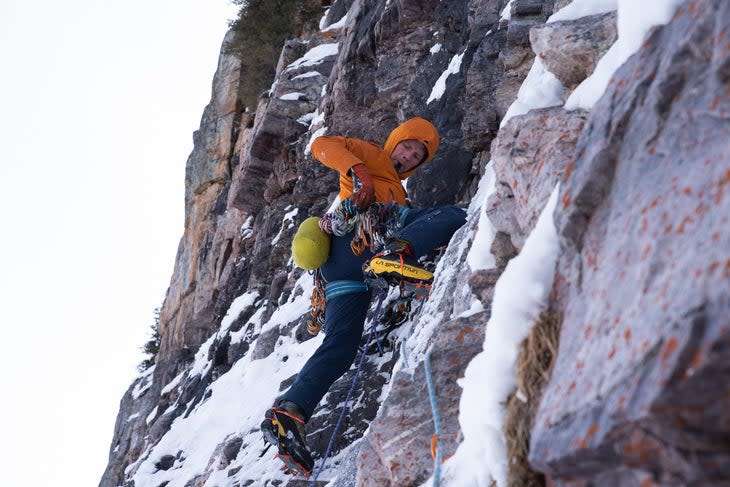
Today, like the wooden alpenstock, pitons are mostly considered "museum pieces," and are not widely used in the free-climbing disciplines of sport climbing or trad climbing. For environmental reasons, they have been replaced by items that, fortunately, do not damage the rock when removed: nuts and camming devices. However, there are a few arenas where pitons are still helpful, despite the environmental cost. In an emergency situation where someone's life is in the balance and time is of the essence, the most expedient and safest method of anchoring is often an anchor involving pitons. On committing, full-day or multi-day alpine climbs, especially in remote areas or big ranges where retreat is often difficult and the rock quality is less than perfect, it makes sense to carry pitons as a backup, especially when many pitches of virgin rappelling may be necessary in the event of an unexpected injury, illness, or storm.
Big-wall routes in good conditions are a different matter. I was a zealous founder of what is now called clean climbing, and certainly applaud any first ascents or repeats of routes using non-destructive techniques. If progress is not possible using these techniques, then perhaps the most permanent bolt (versus pounding in pitons that will create scarring) is in order. This mid-70s "nuts and bolts" (and now cams) philosophy may be the best for long-term protection of as much rock as possible.
What kind of piton is best?
Depends on the type of rock on which you are climbing. As a general rule, on routes where the piton is going to be removed by the second climber after use, sedimentary rocks (limestones, dolomite, sandstones) accept softer metal pitons like CAMP, Simond, or Petzl's offerings more easily and safely. The cracks in these rocks are sometimes non-uniform in length, width, and depth. In metamorphic rocks (marble, quartzite, schist, and gneiss) and igneous rock types (granite, basalt, diorite) where the cracks are more predictable, the harder chrome-moly pitons--Black Diamond or CAMP. etc.--generally work better.
If you must fix a piton
A fixed piton will be always suspect due to frost-wedging, oxidation, etc. Only the person who placed it knew how strong it was. Chrome-moly pins are the strongest pitons, but when left in the rock they can rust easily in humid climates and/or eventually form stress cracks. Even a bomber placement may need replacement in a couple years. A bolt might be a better long-term solution.
Piton Placement
How to place a safe piton
If you have no experience in piton placement and removal, get a few pitons and practice placing them on the ground at a grungy roadcut, quarry, or boulder that is not soon likely to be a destination climbing or bouldering area. Get a runner or etrier and a carabiner to jump hard on the placements while carefully watching to check their strengths. Place and remove dozens of pins, and you will begin to understand where and how to make a safe piton placement.
Like all forms of protection, pitons are directional, but a well-placed piton will hold force along almost any X-Y-Z axis. Since the force of gravity is directly toward the center of the earth, almost all pitons are placed to hold the greatest force straight down. Physics shows that the strongest placement is a piton placed in a crack pointed straight down: In a horizontal crack on a vertical wall (think Shawangunks), a piton placed snugly by hand will hold a few thousand pounds of static load, as long as there is no outward or sideways force vector to pull it out. (Make sure the piton can resist some pull in any direction.) The weakest placement is one pounded straight up into a crack in a horizontal roof.
Unfortunately, most piton placements are in the vertical crack that you are ascending, making them somewhat less secure. Pick a place in the crack that is, if possible, slightly wider than the crack immediately above or below the spot where the piton will go (a pod), much as you would place a nut. In a perfect vertical-crack placement, even without much pounding, the force of a fall will torque the piton down at the eye and up at the tip, and jam it in like a crowbar. You don't need to overdrive a technically excellent placement.
In a totally parallel-sided crack, the piton can twist out, so you need to pound it in with much force. Pick a piton where the blade can be hand-fit about one-half to two-thirds of the way into the crack, depending on the rock type. The first hammer blow is very important when you're leading. A light but perfectly angled hit will set the piton in the right direction, followed by heavier blows. However, a too-soft tap or a poorly angled hit may cause the piton to fly from the crack and be lost, since you are probably hanging on with your other hand and don't want to fall quite yet. Each hammer blow should be equally powerful and should meet with very-slightly-increasing resistance, until the eye of the piton is flush with the rock. Listen carefully to the musical pitch of the hammer striking the piton. Like driving a nail in hardwood, the sound should increase in pitch with each blow.
Caveats
Be sure that you aren't putting a piton into a loose block or flake that could pry off, expand, or is not solidly attached to a larger mass of rock.
If the piton rings nicely as it goes in and then suddenly stops moving with a thud before it is fully placed, STOP pounding immediately. It probably has bottomed-out, i.e., hit the solid end of the crack, and it must be either tied off or re-hammered with a slightly thicker pin.
Mud or dirt or ice in a crack may lead one to believe the placement is more solid than it actually is. Be careful.
Chrome-moly pitons are extremely tough, but they are a bit brittle. If you have made an excellent placement in most respects, but the blade is only halfway or three-quarters in and you clip into the eye, the sharp angle at the point of force may break the piton. Tie it off (use 9/16" webbing) as close to the rock as possible and clip into the hero loop, not the eye!
Testing a piton
Before trusting your life to any piton, test it with your hammer. Hit it lightly back and forth, parallel to the crack (up and down in a vertical crack, left and right in a horizontal), and carefully watch to see if the piton moves, if it makes a ringing sound when tapped, and how much resistance it offers to the hammer. If your hammer bounces back up sharply with a ring when you hit the head of the piton and the piton does not move, you likely have an excellent placement. When you come across a fixed piton, check the eye for cracks, see if it is bent or loose, and test it with your hammer. Unfortunately, many fixed pitons that pass these tests may still be dangerously weak in the rock where you can't see it. If you can't test it, back up ANY fixed piton that you find before you trust it. Finally, never use a hammer on a bolt!
Piton Removal
To take a piton out, pound it back and forth along the axis of the crack. With a well-placed piton, this will take much more physical effort than putting it in. In a vertical crack, for example, hit it a few times times up, then a few times down, then a few times up, etc. until it loosens up and can be removed by hand. The farther you move the piton in the crack, up or down, the sooner it will come loose; however, this will also cause the most rock damage. Use your judgment. Also, it is very easy to drop a piton by hitting it too hard as it loosens up. Some followers always carry a trash carabiner tied to a long, thin sling to clip into the eye of the piton as the piton loosens, to prevent dropping it.
Replacing Fixed Pitons
A piton on a trad route, if there is a good nut or cam placement within a few inches to back it up, may not need replacement. If you need to replace a dangerous-looking piton, first know the legalities where you are climbing. National parks, national forests, BLM, state parks, and private lands all have different rules. An old-soft iron piton may be impossible to knock out; it will get mangled or just break off. Chrome-moly pitons are usually tough enough to knock out and can be replaced, if the hole is not blown out. A stainless-steel bolt may ultimately be a better solution.
Conclusion
Remember, the well-placed piton that you have just pounded in is a bit more versatile, and every bit as strong, as the other forms of anchoring we use today. However, that fixed piton with a shiny, solid-looking head that you come across 20 feet above your last good piece is always suspect. By all means clip into it if you want, because sometimes even a twisted, rusty piton holds a huge whipper. Then either back it up or climb like you are free soloing!
Also Read:
For exclusive access to all of our fitness, gear, adventure, and travel stories, plus discounts on trips, events, and gear, sign up for Outside+ today.

