A Complete Guide To Finger Injuries And How To Recover
This article originally appeared on Climbing
Strains, sprains and other injuries are common among climbers, but they don't have to be. Sign up for Strength Training For Injury Prevention with Dr. Jared Vagy and you'll learn the proper way to train, and be on your way to injury-free climbing.
If you’ve ever injured a finger pulley, you’re keenly aware of the structure. If you haven’t, you might not even know they exist. Finger pulleys are thick, fibrous bands of connective tissue that hold your finger flexor tendons tight along the finger bones and prevent "bowstringing" of the tendons while they are under load. Pulley injuries are common among climbers. Proper management of these injuries is crucial for a full return to sport and to decrease the chance of re-injury.
As a physical therapist of 31 years and climber of 42, I’ve treated hundreds of climbers. I wrote the following pulley rehab program to consolidate the evidence-based research and my own clinical knowledge into a comprehensive treatment plan for climbers. If you recently heard that alarming pop in your hand, or are feeling other signs of injury, here’s what to do.
Key Points
Climbers most-often injure the A2 pulley in the ring finger. Other pulleys are susceptible to excessive forces as well with the middle finger being the next most-commonly injured digit
The A2 pulley is located at the base of your finger near the junction with your palm. The A1 pulley is more in the palm itself, over the MCP joint (metacarpal phalangeal joint)
Treatment for a mild-to-moderate injury requires a balance of protection, scar mitigation, and progressive loading of the injured tissues
More-severe injuries require medical evaluation, possible immobilization, and sometimes surgical intervention
If pain is very severe, swelling is significant, or you can see or feel "bowstringing" then you should seek medical attention. ER visits are usually not necessary but seek medical evaluation within the first 3-10 days
Signs of a Pulley Injury
Immediate onset of pain over the pulley that is often associated with an audible popping sound (there is not always a pop, so you can still have a pulley injury without the sound)
Pain is usually quite severe, especially with direct pressure over the pulley or when trying to crimp or pull with the affected digit. (Do not keep gripping holds and pulling to try to convince yourself that you are not actually injured!)
Swelling is often present over the affected pulley. Bruising can sometimes be present
Pain is typically localized over the pulley and tends to be worse along the sides of your finger. If you flex the injured finger then gently pull out on your fingertip you should feel pain along the pulley
If the pain radiates into your hand or wrist then it is probably not a pulley injury and may be an injury to one of the flexor tendons
Stiffness, swelling,` and tenderness along the knuckles themselves (the PIP or DIP joints) is usually not a symptom of a pulley injury and can be due to a capsular strain, arthritis, collateral ligament strain, extensor hood injury, or other problems
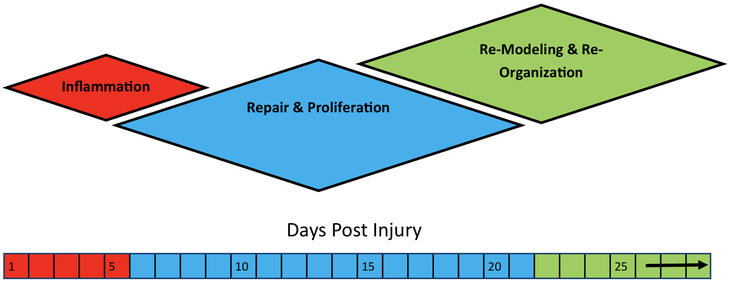
Stages of Healing
Tissue healing can be divided into three overlapping phases: acute/inflammatory, reparative, and remodeling.
Acute phase: Homeostasis and inflammation
(Days 1-5)
Blood vessels constrict, platelets stick together, coagulation occurs, and fibrin threads are formed to stop bleeding, seal the injury site, and create a scaffolding for the re-building process
Macrophages and white blood cells clean the area and secrete growth factors and cytokines to stimulate fibroblast proliferation
Inflammation is a necessary part of normal healing and is only a problem if the response is too aggressive or lasts too long. Ice is helpful to reduce pain and may help reduce inflammation, but has not been proven to improve the overall healing response. NSAIDs can also be helpful but only if the pain or swelling are excessive in the first few days
Repair and proliferation phase
(Days 3-21)
New blood vessels form and the body starts to rebuild the damaged tissue with type III collagen (scar tissue). This collagen is weak, disorganized, and easily re-injured. Pain free movement is crucial in this phase to help the new collagen align itself parallel with the normal forces placed on the tissue. Gentle massage and Wave Tool work can also be helpful in this stage. [Disclosure: The author is the co-founder of Wave Tools Therapy]
Remodeling and reorganization phase
(Days 14-2 years)
Type III collagen is replaced with stronger and better organized Type I collagen. It's critical for this reorganization to occur so that the damaged pulley tissue is strong and healthy enough to handle the stresses of climbing. A very controlled and progressive loading program is crucial for this reorganization to occur. Wave Tool use with the edges can help stimulate a healthier healing response
Climber’s Pulley Injury Complete Rehabilitation Program
Part 1: Overview
Part 2: H-taping
Part 3: Getting back to full strength
Treatment Flowchart
During the inflammation phase:
Ice for pain control
Rest: No pressure or force through injured finger
Pain-free, passive motion
Pain-free, active motion
NSAIDs only if pain or swelling is excessive
Stimulate immune and healing response with healthy diet and exercise
During the remodeling and reorganization phase:
Begin tendon gliding exercises. (See videos above)
Begin stretches for entire kinetic chain (hand, wrist, elbow, shoulder, thoracic and cervical spine)
Gentle Wave Tool use with edges and massage surfaces for desensitization, blood flow, and waste removal. Use on all finger pulleys and along entire length of forearm and elbow flexors. (See videos above)
Begin the Progressive Loading Program. (See videos above and climbing program outline below)
Ice if needed for pain control
Heat is OK to add in for short duration (5-10 minutes) for comfort and blood flow
Limit use of NSAIDs
During the repair and proliferation phase:
Begin higher intensity muscle and tendon stretches
Increase intensity of Wave Tool with edges and massage surfaces to improve blood flow and to help stimulate collagen deposition in a more organized and uniform arrangement
Continue with Progressive Loading Program using resistance bands and no-hang finger training device (like the Tension Block, Tension Flash Board, or Metolius Wood Rock Rings). You can also start to work on regular hangboard with weight removed
Begin the Return to Climbing Progression. (See videos above and consult the detailed climbing program outline below)
Continue short duration heat applications for blood flow
H-taping recommended for all climbing or progressive loading exercises. (See video above)
All Injuries and people are different. Progress through the program at your own pace. Recognize that there is considerable overlap between the different phases of healing. If you are unsure how to proceed then you should seek qualified medical evaluation and guidance.
Pre-Climbing Resistance Training
Begin this progression 5-10 days post injury
Only progress to the next training level when you can perform the prior level with minimal or no pain
Go slowly with all motions and progress through resistance levels carefully. If you are mildly sore for 30 minutes to 1 hour after a session that is fine. If soreness persists for several hours or into the next day then you must decrease intensity
Level 1: Isometric holds
5 x 5 x 5 program (see videos)
Using a flat edge such as the side of the table or counter edge, or use a no-hang device (see video). Open grip position only--NO CRIMPING. Using all four fingers, gently pull on the edge just to the point of feeling pain over the pulley. Now back the pressure off until no pain, or only very mild pain, is felt. This is where you will perform the hold. Pull for 5 seconds, 5 reps. Next pull with three fingers (index, middle, ring). 5 second hold, 5 reps. Now very carefully and gently pull with the injured finger and the finger next to it (middle and ring). 5 second hold, 5 reps. Perform up to 5 times in a day.
Follow a two days on, one day off cycle.
Level 2: Isometric Holds Using Resistance Band
5 x 5 x 5 program (see videos)
Use light resistance bands and a portable no-hang device. Make sure you can accurately reproduce the resistance during each session. Keep track of bands used, holds used, and your distance from the anchor point. A "keeper" sling around your wrist is recommended so that you can let go of the board if any pain is felt. (see video). Begin with the largest grip surface and all four fingers. Open grip positions only. With arm straight walk backwards until mild pain is produced over pulley, now step forward and ease resistance until no pain, or very mild pain, is felt. Hold 5 sec, 5 reps. Now repeat with three fingers (index, middle, ring) for 5 second holds, 5 reps. Now very carefully and gently repeat with two fingers (middle and ring). 5 second holds, 5 reps. Perform up to 5 times on your exercise days.
Continue performing these exercises two days on, one day off. You will progress faster if you have adequate recovery time.
Level 3: Resistance bands with climbing specific movements
(See videos)
Use your no-hang device attached to the bands. Open grip positions only. Start by careful pulling for the following three motions.
Archer Position (pretend you’re pulling a bowstring back) using four fingers. 10 reps, 3 sets
Undercling position with four fingers. 10 reps, 3 sets
Palm down pulls. Keep your palm facing the floor and pull straight back with four fingers. 10 reps, 3 sets
Perform twice per day, training one day on, one day off.
Progress to three fingers then two fingers with the same motions and reps--very carefully. It may take several days before you can advance. You can also advance to smaller grip surfaces if no pain is noted.
Remember: Every injury and every individual is different. Progress at your own pace and listen to your body.
Return to Climbing Progression
Begin the climbing progression 14-21 days post injury. You should be doing all resistance band exercises without pain prior to initiating the climbing plan
The climbing will be in addition to the resistance bands. Follow the frequency plan listed under each climbing level
Perform a minimum of four days of climbing at each level prior to proceeding to the next difficulty level. Advance only if pain levels are not increasing and workouts are done with a minimum of pain or strain
Resume rotator cuff and periscapular strengthening. Bands work great for this as well
Basic climbing
Toprope only. No bouldering. No leading
Climb no harder than three full number grades below your onsight level (i.e. a 12a onsight climber can work at a maximum difficulty of 5.9)
Work on balance, footwork, pushing with your legs, fall practice, breathing, and flexibility. Let go if any pain or twinge is felt
Climbing and resistance-band work will be on the same day. Two days on, one day off
Harder climbing
Toprope only. No bouldering. No leading
Climb one full number grade below your onsight level (i.e. a 12a onsight climber can work at a maximum difficulty of 11a)
Climbing and resistance-band work will be on the same day. Two days on, one day off
Lead climbing and bouldering
Approach all climbs like you would a project. Feel out moves and holds. Toprope first as necessary
Work on minimizing strain and climbing efficiently. Focus on technique: core tension, elbows in, scapulae engaged, etc.
Choose a different climb if you have pain on any of the individual holds. Lead only after you're confident the movement and holds are OK for your injury
You can start to introduce full crimping with your resistance band workouts and slowly introduce full crimping to climbing routes
More rest is needed during this phase. Follow the schedule below to optimize recovery. Band work is still done on the same day as climbing
Each week should have a minimum of three climbing rest days total, with two rest days in a row. If you're feeling sore or aren't progressing, then you should take three rest days in a row to allow for tissue recovery and repair processes. Below is a sample 14 day training schedule. Adjustments to the schedule are fine, but it's best to follow the rest requirements.

Redpoint/onsight training
Begin working towards harder onsight climbing, your project grades, and normal training routine.
Once you’re working back towards your project grade you may take less rest days and progress towards your pre-injury workout schedule. Keep in mind, however, that rest days are critical for preventing re-injury and chronic tissue break down, and to repair tissue micro-damage
Soft tissue injury healing is not always linear. You will have ebbs and flows in your rehabilitation progress. Look at the bigger patterns and look forward to the ultimate goal of getting back to climbing again
Also read: You Climb? You Are Going to Get Arthritis. Here’s What You Can Do About It.
Jeff Giddings has been practicing physical therapy for over 31 years and climbing for 42 years. He was co-owner of Adams and Giddings PT in Fort Collins, Colorado, and now practices in Boulder. Jeff is a co-founder of Wave Tools Therapy.
Strains, sprains and other injuries are common among climbers, but they don't have to be. Sign up for Strength Training For Injury Prevention with Dr. Jared Vagy and you'll learn the proper way to train, and be on your way to injury-free climbing.
For exclusive access to all of our fitness, gear, adventure, and travel stories, plus discounts on trips, events, and gear, sign up for Outside+ today.

