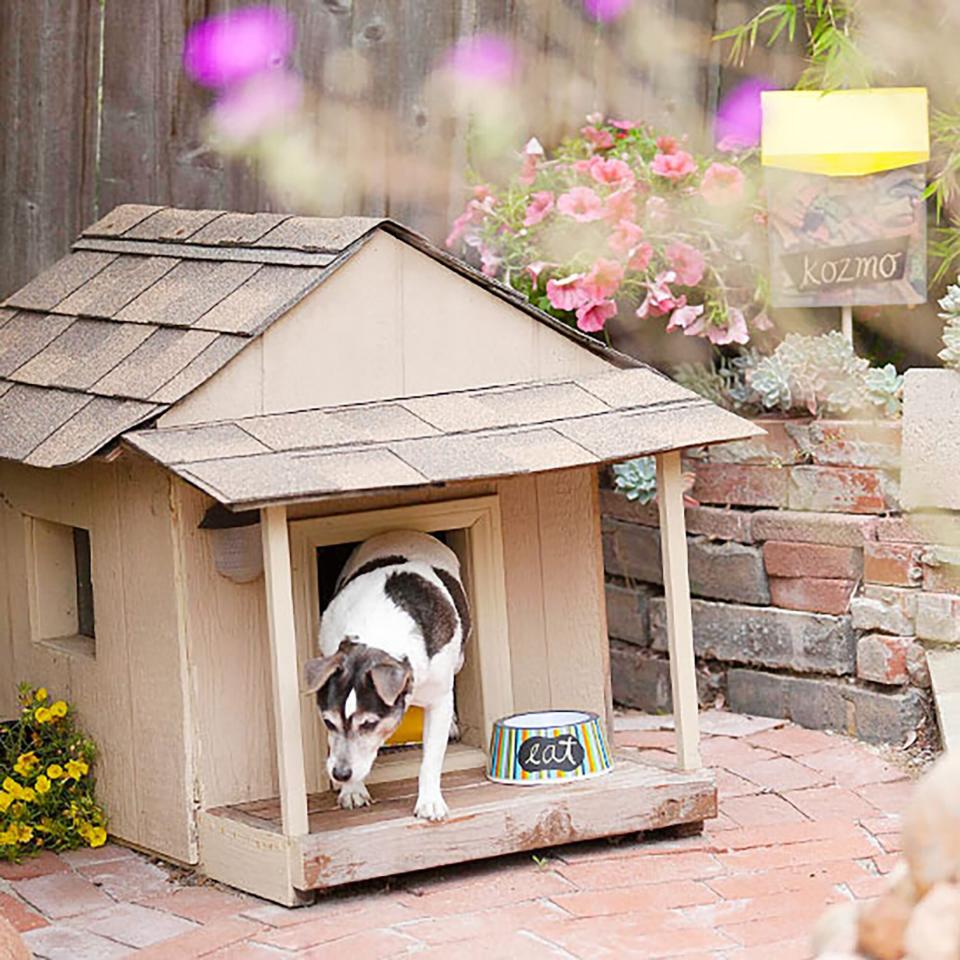
How to Build a DIY Doghouse for Your Backyard
Ed Gohlich
Sure, you could buy a doghouse for your four-legged best friend. But building a DIY doghouse from scratch is the way to really show your pup some love. Customize the size, accessories, and overall style to reflect your dog's character, and your pet will have a place to truly call their own.
When you're planning your DIY doghouse project, there are a few things to consider in advance, like its primary purpose, location, and size. Depending on where you live, you may need to add heating or cooling features. Ultimately the most important thing is to create a spot where your dog feels safe and sheltered. It's a place where she can relax, nap, and enjoy the great outdoors.
This doghouse is designed for easy assembly and to suit a wide variety of pets, but you can easily modify the door height and width to fit your dog. For cold climates, you may want to omit the two windows to conserve heat. Designer Lee Sie created it with a removeable roof, so you can get inside for easy cleaning, to replace bedding, or to retrieve a lost toy.
You'll need basic tools to create this build-it-yourself doghouse design, and the materials can be purchased at most home centers. To save money, it's OK to salvage supplies left over from past projects. Just avoid using pressure-treated lumber products, which can be coated or injected with chemicals that could be harmful to your dog.
Also, remember to keep your pet (and yourself) safe during the building process. Put away tools when you're not around, and clean up paints and glues and fasteners so your curious pooch doesn't get into them. Building materials are among the top toxins that pets get into.
Now, here's everything you need to know to build your dog the customized doghouse she deserves.
Tools You'll Need to Build a DIY Doghouse
Saw (handsaw, circular saw, or jigsaw)
Tape measure
Square
Drill
Bit set, screwdriving bits
Utility knife
Hammer
Wire cutters
Paintbrush
Supplies You'll Need to Build a DIY Doghouse
10 1x2 pine boards
4 2x3 pine boards
1½ sheets of 7/32"x4'x8' exterior plywood
1 sheet of 15/32"x4'x8' exterior plywood
3" deck screws
2" wood screws
¾" wood screws
Roofing nails
Paint of your choice
Three-tab roof shingles
Two 9x11 acrylic panes for optional windows
Parts List for Your DIY Doghouse

Step-by-Step Instructions for Building a DIY Doghouse
Step 1: Build the Platform
Cut the platform frame sides, ends, and supports to length from 2x3s (see the Parts List, above). Working on a flat surface, screw the frame ends and supports to a frame side where shown (see Illustration 1, Platform, below) using 3" deck screws. Then screw the other frame side in place. Cut four porch floor boards to fit the framework (or 24") and screw them to the frame sides with even gaps between the boards.

Robert Wilson
Cut the floor panel to size (see Illustration 6, Cutting Diagrams for Panels, below). Check the frame for square, and screw the floor panel to the framework with 2" wood screws.

Robert Wilson
Step 2: Frame and Sheath the Walls
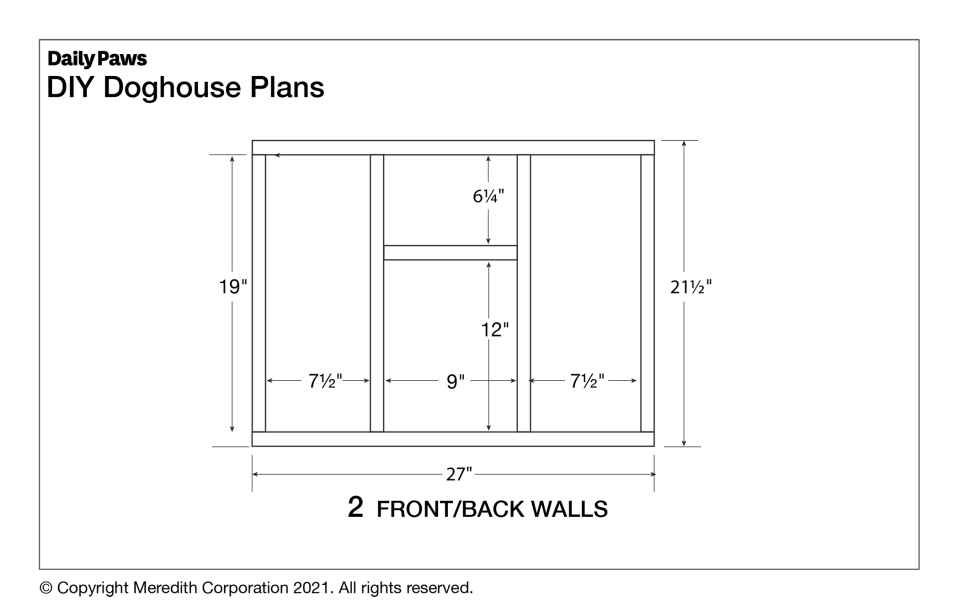
To make the doghouse walls, first cut the framework pieces to length from 1x2s. Starting with the front and back-they're the same except for the front opening-screw the vertical studs to the frame top and bottom using 2" wood screws (see Illustration 2, Front/Back Walls, below). Add the cross brace to the front frame. (If a 9x12" opening is too small for your dog, adjust the spacing of the two inside studs and height of the cross brace.)
Robert Wilson
For the sides, cut the top and bottom frame pieces to length from 1x2s. Fasten the top and bottom to the studs with 2" wood screws (see Illustration 3, Side Walls, below), then cut and add the optional window cross pieces.

Robert Wilson
Measure the front and back, and cut sheathing to fit the overall dimensions (also see Illustration 6, Cutting Diagrams for Panels, above). Trace the front and back framework on the panels, and cut out the front opening and angles for the roof. Fasten the panels to the frames with 2" wood screws. Do the same thing to cut sheathing and make optional window openings for the sides. With the walls and platform assembled, simplify the job of applying a finish by painting each separate assembly.
Fasten the sides, front, and back to each other and check that the corners are square before fastening the walls to the platform with 2" wood screws.
Step 3: Assemble the Removable Roof
Saw the roof braces to length from 1x2 pine and the roof deck panels from 7/32" plywood (for size of panels, see Illustration 6, Cutting Diagrams for Panels, above). For a tight joint, cut a 56-degree angle along one long edge of two roof braces and a long edge of each roof panel. (If you're working with a handsaw, make a guide by marking the angle on cardboard and cutting out a saw guide.) Screw the braces to the panels where shown (see Illustration 4, Roof, below) with ¾" wood screws and fasten the panels together with 2" wood screws. (Tip: Drill pilot holes to help keep screws from drifting off course.) Paint the assembled roof.

Robert Wilson
Cut three-tab shingles to length for 1" overhangs off both ends and the lower edges of the roof panels. While supporting the roof from underneath, nail the shingles to the roof panels working from the roof peak to the bottom edges. On the underside, snip off the exposed points of the nails using wire cutters.
Cut the front overhang (see Illustration 6, Cutting Diagrams for Panels, above) and two 18¾"-long supports. Bevel one end of each support and one long edge of the overhang at 80 degrees. Screw the beveled ends of the supports to the overhang and nail shingles to the top of the overhang. Drive screws from the underside of the platform to fasten the bottom ends of the supports to the front of the platform (See Illustration 5, Assembled Side, below).

Robert Wilson
Now add the dog bed of your choice and slide the roof into place so the lower roof braces rest on the frames of the front and back walls. You can even leave a special treat on the bed as a housewarming present.

